 |
| "Learning to think as a photographer is a valuable skill" - Shmuel Thaler |

Friday, May 31, 2013
Special Guest Speaker: Shmuel Thaler, Sentinel Photographer

Wednesday, May 29, 2013
Special Guest Speaker: Rebecca Stark, Professional Wedding Photographer
 |
| "Always be shooting" - Rebecca Stark |
Tuesday, May 28, 2013
Special Guest Speaker: Neil Simmons, Fine Art, Portrait and Wedding Photography
 |
| "There are no secrets in photography" - Neil Simmons |
Wednesday, May 22, 2013
New Assignment: Making Animated Gifs
Hello Students,


Previous Student Work Samples:


Your new assignment is an introduction to making animated Gifs, and harnessing your skills to create a more elaborate animation or a cinemagraph style gif.
What is an animated Gif?:
A Gif file is a web safe file format that has a cool feature, it can have different frames like a video, you can also change the playback speed and duration per frame. Unfortunately they can't have sound.You can do some really cool stuff with Gif's!
A Gif file is a web safe file format that has a cool feature, it can have different frames like a video, you can also change the playback speed and duration per frame. Unfortunately they can't have sound.You can do some really cool stuff with Gif's!
More examples:
http://fluxmachine.tumblr.com/
http://fluxmachine.tumblr.com/
What is a Cinemagraph?:
A Cinemagraph is just a fancy digital media term for an animated Gif that has the appearance of a still image (graph) with small portions of the image appearing to be moving or appear to be animated (cinema) usually in a seamless or near seamless loop. Some Cinemagraphs will loop the animation constantly, some repeat with a delay to give the viewer a surprise when the photo they are looking at suddenly turns and looks back at them or blinks like the example below.
A Cinemagraph is just a fancy digital media term for an animated Gif that has the appearance of a still image (graph) with small portions of the image appearing to be moving or appear to be animated (cinema) usually in a seamless or near seamless loop. Some Cinemagraphs will loop the animation constantly, some repeat with a delay to give the viewer a surprise when the photo they are looking at suddenly turns and looks back at them or blinks like the example below.
 |
This cinemagraph is made from the frames of a movie and has a very short loop of just the eyes blinking... work has been done to create a still frame of the actor who was moving slightly, then the eyes were isolated and the motion removed with a motion tracking software tool. Finally the frames were isolated and reduced for a small file size and a delay set on the first frame of a few seconds.
|
Gif Assignment:
Part A
- Create a simple frame by frame animation, use your creativity!
- Create an animated gif, use the layers to frames method to create a simple frame by frame animation. Create at least 30 frames of animation.
- Follow the instructions below as a rough guide only. There are several ways to make animated gifs in photoshop
- This is just a quick project to get you used to creating gifs. The final gif must display on your blog full size in order for animation to work, so make sure the image size is small enough, perhaps around 500 pixels wide
- When the animation is complete use the Save for Web feature in Photoshop. Set the file type to gid, adjust your colors and looping options and post to your blog when done
Part B
- Create a longer animation this time that loops perfectly with a series of photographs or video footage. Follow the instructions further down this post for a guide.
- For photos, use the Continuous Shooting mode on a camera for rapid fire shooting of frames. A Video camera on a tripod may also be used, photoshop can read video files although working with frames and video is different with photoshop
- For a Cinegraph style animation Try to create an effect where just one part of the image is moving, such as eyes moving/blinking or the head turns and looks at the camera.
- Check out http://fernandojbaez.com/cinemagraph-tutorial/ for tips on making cinemagraph style images.
How to make an animated Gif with Photoshop CS5:
- Launch Photoshop
- FILE / OPEN a new document at your desired size, I made mine at 200X180 Pixels. It's a good idea not to make Gif files too large, otherwise they can take along time to load over an internet connection.
- Your animation can be a series of images, photos etc. You can hand draw each frame the animation also. The key is to set up separate layers that you will turn into frames of animation. Im using some pictures I took of my dog.

- Click your top Layer, then while holding SHIFT click on your bottom Layer to select all layers
- On your Animation Palette Sub-Menu select Make Frames From Layers
- If you don't see individual frames in your Animation Palette, go to the Sub-Menu and select Convert To Frame Animation
- You can now designate individual durations on each frame.
- Go to FILE / SAVE FOR WEB AND DEVICES to export your animation as an animated Gif file. Make sure to set your looping options to forever.

- Open your Gif file in a web browser to test it. Here's my result:
Cinemagraph Photoshop Process:
 |
This is my Cinemagraph. My first frame of animation pauses for 5 seconds before animating.
|
- Setup your frames of animation as Layers from the bottom up. The bottom Layer will be the first frame of animation

- You should have 1 layer as the "still image" background and then your other animated layers above
- On the Animation Sub-Menu choose "Convert to Frame Animation"
- You can set durations here, but if you want to animate your layers go to the Animation Palette Sub-Menu and choose "Convert to Timeline"


- Your layers are animated across the timeline, you can select a layer and change its opacity to be visible for a longer duration. Open a layer in the Animation Palette to see its animation attributes. You can adjust when certain layers are visible in your animation frames here. Look at the keyframes in the Opacity value.

- Play your animation to test
- Resize so Gif file can display on your blog at 100% size
Previous Student Work Samples:


Special Guest Speaker: Ron Jones, Fine Art Photography
 |
| "My job, as a photographer, is to find the particular moment when something profound, deeply personal, and true, is revealed in a way that can be shared." - Ron Jones |
Today our class was honored to host Ron Jones, a fine art and studio photographer who maintains a studio in downtown Santa Cruz and travels the across the globe to capture striking images from bali and southeast asia to mexico. Ron discussed his professional studio work and shared his experiences photographing artists, musicians and their musical instruments from hand made guitars built in Santa Cruz to a stradivarius. Ron shared amazing and striking images and prints from his travels to Burma, Cambodia and Mexico and encouraged students to travel and explore and additionally expressed the importance for students to learn about other people and their cultures and experiences as enriching experiences and to bring the photographer closer to their subjects and closer to understanding the perspectives of others. You can see the work of Ron Jones at his website, rrjones.com. Our class extends a big thank you to Ron for sharing his time, insight and advice with us.
From Ron's website, rrjones.com:
"There is a trace of individuality that can be seen in a fraction of a second. My job, as a photographer, is to find the particular moment when something profound, deeply personal, and true, is revealed in a way that can be shared. The message is there—I just have to find it in order to pass it along. In that way I’m like the go-between in the world of spirits, a world of non-verbal communication. Messages are all around—some useful, some misleading— but the ones that serve as the basis for good photographs reveal themselves rarely. "
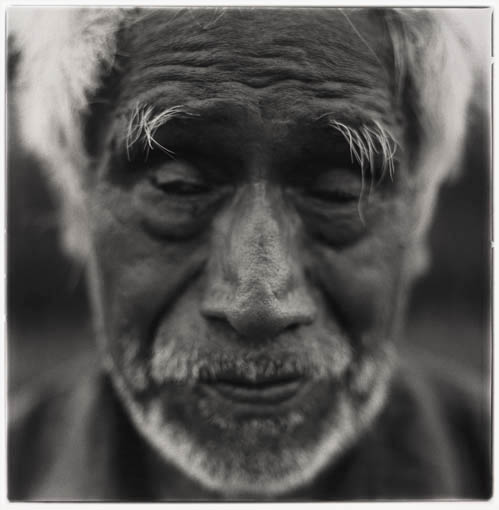 |
Blind Man of the Tope - Photography by Ron Jones
|
Thursday, May 16, 2013
New Assignments: Using The Clone Tool In Photoshop and Setting White Balance
Hello Students,
Here are two exercises for you to work on today. The Clone Tool is a powerful way to edit content out of a photograph. The other exercise is using the White Balance settings on a camera, which is a method for calibrating your camera to your specific scene. It makes the white levels of light in your photo match the actual levels in your scene.
Using The Clone Tool In Photoshop:

- Find a photo that you have taken, or go out and take a photo that has something you can remove, or edit out of the shot. For instance, you could try to remove a logo from someones clothing or hat, or remove a poster from a wall or an object sitting on the ground, etc.
- Open the photo in Photoshop
- Duplicate your background layer, you can make a copy by dragging to the Document Icon on your Layer Palette
- Select the Clone tool and set your brush size
- Hold the Option key and click to sample from a clean area. Release the Option key to paint the object out of a scene. Reselect your sample area as needed
- When your done, compare the scenes side by side
- Go to Image > Image Size and double the width
- Drag your edited layer to the left or right, show the before and after versions
- Save as a JPG and post to your blog
Understanding White Balance:

You will have to use one of the class cameras unless your own camera has similar WB settings. Work on the other assignment if a camera is unavailable. Photos need to be in proper exposure and in focus.
- Take 4 identical pictures using the following different Wite Balance settings. Use a tripod to ensure your images stay as identical as possible for comparison:
- Sun
- Shadows
- Cloudy
- Tungsten light
- Place all 4 images into a single Photoshop document and label each one with the white balance settings you used. Save as a JPG and post to your blog.
 |
This shows different White Balance "Modes" for different light conditions
|
 |
White Balance Mode symbols
|

Due after Thanksgiving break...
- Mr. W
Monday, May 13, 2013
Researching and Networking Local Talent
Hello Students,
Your next assignment is to research photographers that live in Santa Cruz County. Developing skills in networking is essential to future opportunities beyond school and college. After researching your artist you will contact them and ask them to visit our class as a guest speaker. Hopefully we will have a good number of willing participants to visit our class.
 |
Networking is a valuable skill, it can give you insights into different industries and open job opportunities that may not have been available to you.
|
Researching and Networking Project:
- Use the internet to find and research 2 local photographers. You can use google to refine your search. You could even try looking in the phone book. Look up the artists website, portfolio or even if they have an office location in town. They could be commercial photographers, journalists, fine art photographers, portrait artists etc. Take time doing the research and find someone who's work interests you
- List the artists name, website and links to any work they have done as a new page in your portfolio, add the informational interview here as well if you conduct one
- Contact the artist via email or telephone, refer to the script below as a guide to introduce yourself and ask questions, above all be professional.
- If the artist can't make a public appearance, ask them if they would be willing to give an informational interview either on the phone or via email. Type up the results of your interview and post to your blog.
- We want to know how the artist got their training? What is their education? How long have they been working? Who are their clients and how do they find new clients? How do they keep their skills current?
- If you are conducting an informational interview, here are some more questions you can ask
Sample Introduction Script:
Dear _ _ _ _ _ _ _ _
My name is (your name here) and I am a digital photography student in the Regional Occupational Program at Santa Cruz High School. I am researching local photographers and artists as part of a class assignment. I really like your work and would like to ask if you would be interested in being a guest speaker in my digital photography class. Our class meets M-F from 12 to 1:30 PM, just let us know what date would be best and we will send along details. If you are unable to make an appearance than I would like to conduct an informational interview with you either through email or on the phone if possible. Please let me know if you can spare any time. Thank you very much for your time and I look forward to hearing from you.
- Sincerely
(Your Name Here)
(Your Email Address Here)
Santa Cruz High School Graphic Design Student
http://ropdigitalphotography.blogspot.com
Thursday, May 9, 2013


Thursday, May 2, 2013
Advanced Portrait Study
Hello Students,


This assignment is an advanced study in portrait photography. You will have to find a volunteer to model for you. Your task is to take a series of portraits as outlined below. The challenge with this project is to coach your model to position themselves in a way that shows their best look. A standard roll of film has 36 exposures. Take at least 2 rolls worth of film, or roughly 70 photos over the course of this challenge, create a Contact Sheet and choose your final 7 images from them.
Advanced Portrait Study Assignment:
Your client (who is a famous model, celebrity, or actor, or millionaire executive) has just hired you to shoot a series of portraits for an upcoming magazine ad/article/brochure/book/event/etc. Your job is to get them to open up and show their best side to your camera. You must coach them, break them out of their comfort zone and follow your directions to show their best look.
Required Reading:
Required Watching:
- Find a volunteer to act as your model. You will be shooting many shots so they must be committed
- Shoot a series of images for each of the techniques listed below. Upon completion you should have over 70 images to choose your final 7 from
- Final deliverables: Contact Sheet in PDF Format and 7 final images posted to blog
1) Alter Your Perspective:
A photographers instinct is to shoot at eye level, try an extreme angle from different sides. Try to position yourself around the subject, not vice versa. Try multiple angles and take a shot or two from each one.
 |
Photo by striatic
|
2) Looking Off Camera/Off Frame:
Have your subject framed at different distances and looking off camera. Have your model focus on something unseen or seen, off in the distance or closeup. This helps create an air of mystique. Shoot multiple shots from different distances.
 |
Photo by monicutza80
|
3) Looking Within The Frame:
Have your subject looking at something within the frame. Consider what they are looking at. If it is a snack they might seem hungry. If it is a cell phone that is ringing perhaps they look annoyed.
 |
Photo by paulbence
|
4) Experiment With Lighting:
Try shooting indoors with no lights except our studio lights. Try looking for a single light source, or anywhere with deep shadows or shadows that can cast a patter on the models face. Try light sources from the front, back, sides. Shoot multiple images.

5) Get Your Subject Out Of Their Comfort Zone:
Ask your model to get out of their comfort zone by doing something active such as jumping, spinning, dancing, riding a bike, sprinting, stretching, doing kung-fu etc. Shoot as many action shots as you can, make sure to adjust your exposure settings to reduce motion blur.

6) The Candid:
Ask your model to go about their business and pretend you aren't there. Follow them around, shoot images and try to capture those natural moments.
 |
Photo captured by Christopher Rye
|
7) Get A Smile:
While you are taking pictures, at any time, tell a joke and try to make your model laugh a genuine laugh. If you time it just right and anticipate their laughter you can snap a shot at the right time.

Last Step) Make A Contact Sheet Of All Images:
A contact sheet is a great way to view all your images at once. That way your client can see all the images easily and pick the best ones.

This project is due Tuesday. - Mr.W
Subscribe to:
Posts (Atom)